Obtaining a Facebook badge is a common goal for most international brands. Let’s explore in detail how to get a blue verification badge on Facebook.
What is Facebook account verification? To combat fake accounts, Facebook has adjusted its verification feature to meet the needs of both the platform and users. Verification is no longer used to confirm celebrity status but focuses on authenticating businesses, brands, and personal social media accounts.
For both personal Facebook profiles and business accounts, the higher the follower count, the more vulnerable they are to identity theft and impersonation. Since the introduction of Meta Verified, getting a blue badge on Facebook has become easier. Meta Verified is a paid subscription service for creators or personal Facebook profiles, costing $14.99 per month on mobile and $11.99 per month on the web. You can choose single or dual account subscriptions (including your Instagram account), with dual accounts costing more.
In this article, I’ll focus on how to verify your Facebook business account.
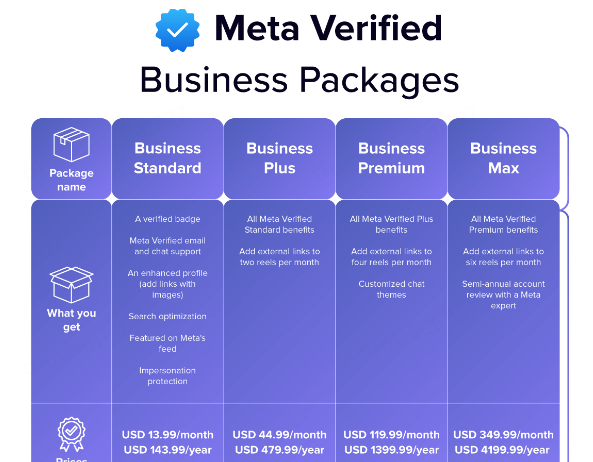
Meta Verified Business Subscription Meta Verified offers four business subscription plans. You can find more information about each plan here (https://www.facebook.com/business/tools/meta-verified-for-business).
If your page was previously verified, you can still sign up for Meta Verified.
Why verify on Facebook? Meta Verified features enhance authenticity and security across all Meta services and combat account fraud, impersonators, and fake accounts. The blue verification badge indicates that Meta has verified the Facebook account’s brand, business, or public figure using official ID verification, confirming that the account owner is a legal entity and validating the owner’s authorization.
Common reasons for getting a blue verification badge on Facebook include:

- Enhancing business credibility with features like developer tools, WhatsApp Business platform, and Facebook ads for financial service providers.
- Making it more difficult for your account to be impersonated.
- Appearing at or near the top of Facebook search results, attracting more traffic and potential customers.
- Gaining an enhanced profile with additional fields and the ability to add image links for easier discovery.
- Accessing more help channels for Facebook account issues.
- Adding external links to Reels.
How to Apply for Blue Verification on Facebook There are several ways to get a blue badge on Facebook. Follow these steps to register your business for Meta Verified.
Verification through Meta Business Suite on Desktop: Phase 1: Choose your business asset and set up payment
- Log into your Business Manager account and click “Settings” in the left menu.
- Click “Meta Verified” in the left menu, then click “Sign up now” or “Join waitlist”. (If you don’t see it there, click here and follow the prompts to add yourself to the waitlist).
- Select the business asset (personal Facebook account or business page) you want to verify, then click “Sign up now”.
- Choose your location and currency, then click “Next”.
- Review your subscription and click “Next”.
- Add a new payment method or select an existing one.
- Click “Next”.
- Click “Confirm”, then click “Next”.
Phase 2: Enable two-factor authentication (if not already set up)
- Click “Set up” to enable two-factor authentication on your personal Facebook account.
- Choose the security method you want to add and follow the on-screen instructions.
- Click “Turn on” to make two-factor authentication a requirement for everyone in your business account.
- Ensure two-factor authentication is enabled, then click “Next”.
Phase 3: Verify your business details
- Click “Start verification”.
- Select the country/region where your business is located, then click “Continue”.
- Enter your business information on the next screen, then click “Next”.
- Select your company from the results list, then click “Next”.
- Review your business information, then click “Next”.
Phase 4: Choose verification method Choose email, SMS, phone, or domain verification, then continue following the detailed instructions. Choose the option that works best for you and follow the on-screen instructions. The information you provide must match the business information on the page, especially the phone number, email address, and website.
Verification through the Facebook App Whether you’re using an iOS or Android phone, the verification process is similar.


- Open your Facebook app and click the menu to go to your profile page.
- Scroll down the page until you see “Meta Verified” and click on it.
- You’ll enter the Account Center and find the Meta Verified submenu item at the bottom of the left menu.
- Next, select the profile you want to verify (can be a personal Facebook account or Facebook page), then follow the prompts to confirm your subscription.
- After payment, you’ll receive identity verification.
Note: After completing the verification process, you’ll receive Meta Verified benefits, including a verification badge, proactive account protection against impersonation, and exclusive stickers for Stories and Reels. Under specific conditions, you can update your verified business profile picture twice every 60 days. Verification can take 10 minutes to 14 days to complete, and Facebook will notify you of the result.
Once verified, the badge will appear:
- On your Facebook page
- Next to your page profile picture in comments
- In search results, next to your page name and profile picture
- In Messenger messages
- In Reels, Stories, and Feed
What happens if Facebook rejects my application? There are two main reasons for verification failure:
- You need to provide more information (this can be for many reasons): Your ID photo is unclear, your ID has expired, is difficult to recognize or view, the language is not supported, or the document is not accepted.
- Your submission was rejected. These reasons include Facebook suspecting you submitted false or misleading information, tried to claim a business or page you have no right to represent, attempted to bypass the verification process, your website failed to load, lacks an SSL certificate, or has error pages.
6 Ways to Increase Verification Success Rate Getting Facebook verification seems simpler, you just need to pay, but it still requires an approval and verification process. The following tips can help you get the blue check verification badge:
- Maintain professionalism: Use professional language in posts, keep posts clean and policy-compliant. Facebook considers this factor.
- Update your business information: Ensure your business details are up-to-date on your Facebook page.
- Fill in your details: The more information included in your business profile, the easier it is for Facebook to verify.
- Link to other business assets: Ensure they’re all brand assets and remain consistent, and don’t confuse them with any personal assets.
- Post continuously: Regular and continuous posting tells Facebook you’re an active user.
- Run Facebook ads: In this case, you don’t need to submit too much information because your billing information has already been reviewed and approved.
Frequently Asked Questions How many followers do you need to apply for a blue badge on Facebook? Facebook has no minimum follower requirement. For businesses, check the eligibility criteria here (https://www.facebook.com/business/help/1980422732333373?id=579726174359330). For creators, you can check here (https://www.facebook.com/help/596285382333151?helpref=faq_content).
How many views do you need to apply for a blue badge on Facebook? Facebook has no minimum view requirement. For businesses, check the eligibility criteria here (https://www.facebook.com/business/help/1980422732333373?id=579726174359330). For creators, you can check here (https://www.facebook.com/help/596285382333151?helpref=faq_content).
How can you become eligible for the blue checkmark on Facebook? Meta evaluates several factors when assessing Facebook page information to determine if they meet their verification criteria.
Applicant eligibility:
- You must be at least 18 years old and reside in a country/region where verification is allowed.
- You must have full control of a business in Meta Business Suite for at least 30 days, and should not make changes to the business portfolio, such as changing the business name, before applying for verification.
- You must also use two-factor authentication and comply with all relevant terms of service.
Business portfolio eligibility:
- The business portfolio must meet all eligibility criteria, including the portfolio duration (currently three months).
- The number of people with full control of the business portfolio must not exceed the maximum number (i.e., three people).
- The business must be located in a region that supports Facebook verification and comply with the terms of service.
Business asset eligibility:
- The business page you want to get FB verification for must have a complete profile, including a profile picture, cover photo, and category.
- The Facebook page should have at least three months of history and be associated with an Instagram account.
- The Facebook business page must not exceed the allowed number of changes before application and comply with its page policies.
Learn more about business Facebook verification eligibility requirements here (https://www.facebook.com/business/help/1980422732333373?id=579726174359330).
For personal profiles, Meta’s eligibility criteria for getting a blue badge on Facebook are slightly different.
Applicant eligibility:
- You must be at least 18 years old and reside in a country/region where verification is allowed.
- You must have a government-issued ID and own an eligible Facebook account.
- You must comply with Facebook’s terms of service and community standards.
Facebook account eligibility:
- Your account must be a personal account and comply with Facebook’s naming standards.
- Your profile must have two-factor authentication enabled, meet minimum account activity requirements (e.g., previous posting history), and comply with all relevant terms of service.